First Post
| Previous Post | Next Post
As with the walls, the windows were molded in the color I wanted them to be,
so I didn't bother to paint. Unlike the walls, I haven't run into any
problems stemming from this decision. All of the windows are on a single
sprue, facing the same way, so painting would be a snap, but I'd then have to
scrape the paint away from the gluing lip where they attach to the wall.
Casting is good, with all of the window lites patent and no flash to cut
away. A sheet of clear plastic (acetate?) is provided for glazing.
As I mentioned in
the first post, the kit provides optional panels for bricking over some of the window
openings, but also provides enough windows to have them in every
opening. Since I had bricked over two windows, this left me with two
extra windows. I also had a few windows from the last time I built this
kit.
The windows are sash windows. Care must be taken to install them right
side up. As viewed from the outside of the wall, the upper sash sticks
out more then the lower pane. The inner surface has two levels, with the
lower sash sticking out (see first image). This means that if you use a
single piece of glazing for both sashes, it will have to fold over the
transition between the upper and lower sashes. Cutting separate pieces for the
upper and lower sashes eliminates this problem
My first step was to treat all of the windows with several coats of the dilute
India ink I've already described. I used the same large, soft brush,
concentrating on the part of the windows that would show., and keeping away
from the gluing lip. The plastic used for the windows is relatively
soft, and using a number 17 (chisel) blade, you can punch out the lower sash
by fitting the blade against the window frame and pushing in. Doing so keeps
the window frame intact, but leaves the sash too small to reposition and
reuse. I tossed them into a small parts container for later use - I
think they'll look good in a dumpster if I do a later kit where the windows
are being replaced. Even the sashes that came out broken would be useful
in this regard.
Since the original sashes couldn't be used for raised lower sashes, I cut new
sashes from the extra windows. Each donor casting can provide two bottom
sashes.
I first cut away the gluing lip with a number 11 blade, then switched to a
number 17 chisel, fitting it at the seam between the upper and lower sashes,
then working outward to separate the casting into an upper and a lower
half. Finally, I removed the raised remnants of the window frame, giving
me a flat, thick edge on the sash. I could have simply installed the
lower sashes backwards (inside-out), but the muntins are molded with a thinner
side facing out, and for the lower sashes to visually match, they need to be
installed outside-out. The second image shows the frames with their
lower sashes removed, and the separate sashes I made from the extra windows.
At this point, I glazed everything, using canopy glue. I used a
toothpick to transfer a drop of glue to the sash, then placed the
glazing. There's probably a better way, since I frequently ended up with
glue on the visible part of the glass. Canopy glue dries clear, though,
so the results look like cracks in the glass rather then giant blobs of
out-of-scale glue.It's not what I wanted, but not terrible.
Two of the windows on the second floor have window A/C units. I found
these on eBay. They're two different types, even though my vision of the
building's interior is that each level is its own apartment. One is visibly
larger than the other, and the initial plan was for the larger unit to go on
the side window, since that window looked onto a larger room.
Unfortunately, the small unit didn't go together quite right, so I moved it to
the side, where it would be less obvious. The larger unit is a solid casting, only needing paint; it moved to the front window.

The smaller A/C unit arrived as a flat piece with scores, designed to be
folded into the three-dimensional model and glued in place. I found that
the part folded easily enough, but the liquid cement failed to hold it into
its folded shape. Clamping and/or thicker cement might have solved this,
but I added scrap styrene to the interior to serve as extra gluing
points. Even then, one of the edges failed to hold, and the finished
unit has a trapezoidal shape, with one open seam. The model was also
designed to protrude into the window frame, as a real unit would. Since
this would have required careful fitting of a shroud between the A/C and the
window frame, I instead cut the A/C flush with the window frame.
For both units, once I had primed and painted them, I attached their inner
face (i.e. the face that would face into the building) to a scrap piece of
styrene, leaving extra styrene all around; then trimmed the styrene flush with
the top of the A/C unit. This styrene forms the shroud that is typically
seen between an A/C unit and a window frame, since the window is typically wider than the A/C unit. These shrouds tend to be white plastic, so I
left the styrene untreated.
I fitted the air conditioner into its window frame, making sure that the unit
sat snugly against the bottom of the window frame, then glued it in
place. The smaller unit includes legs to support its weight, but they
were too long once I had trimmed the unit to properly fit in the window. When
I trimmed the legs, I trimmed them too much. I'm still not sure how I managed
that, since I did test fit, but done was done. My solution was to wedge a strip
of wood (from a toothpick) between the legs and the building wall, as if a
strip of wood had been used to better distribute the weight of the A/C. I
painted the wood once or twice with the same India ink wash to give it a
weathered look.

Once the styrene shroud's glue was dry, I glued the upper sash in place, then
added a strip of styrene bar stock along the bottom edge of the upper
sash. This both eliminated any gap I might have inadvertently left, and
reinforced the entire assembly. I made the bar stock long enough to extend over the frame of the window casting, so the weight of the A/C is carried in part by that frame, not merely by the shroud. The fourth image shows the completed assembly,
viewed from the interior of the model. Note that I took this image at a later
stage in construction; all of the window work was completed with the walls
still separate.
I was still thinking about modeling some of the interior, and of lighting the
model, so window treatments were important. The kit comes with a sheet of
paper window blinds, but those are opaque. I found printable decal film on
Amazon - it comes in both clear and white. I printed various patterns for
Venetian and pull down blinds on clear film, then applied these decals to the inside of some
of the windows. The opacity of the color is a lot less then I anticipated, but
it still looks correct, probably since the printed lines are so small. If you
go this route, note that decal film comes in both ink-jet and laser types, and
you need to get the type that matches your printer. Further, the ink-jet type
needs to be clear coated before you place the decal in water, or the ink will
float free from the decal.

I also printed out decaling for the picture windows on the first story. Here,
I wanted gold lettering spelling out "Clyde Bruckman, Life Insurance". Note
that since the decaling was to go on the inside of the glazing, the letters
had to be printed backwards.
The first attempt looked good when still on its backing paper, but once I
moved the decal to the glazing, the yellow text got lost against the clear
background. Giving a black surround to the lettering solved this problem, but
the unprinted areas of the decal gave the window a blurry look, and the blurry
look was uneven, so I discarded the second attempt, too. I found clear acetate
that can be printed on with an ink-jet printer, and this solved the problem.
Once the ink dried, I applied these windows with canopy glue.
To replicate cheap pull-down blinds, I used standard masking tape, and then
blue masking tape for a slightly upscale look of the same type of blind. I
also cut up small pieces of dried-out hand wipes for curtains. Of the two
types I used, I discovered that one has tiny diamond imprints, which added to
the look of curtains. I used canopy glue again here, and in some cases
deliberately folded the material to give volume and folds to the curtains. See
the top image for the interior view of the decal, masking tape and hand-wipe
set-ups. Decal blinds are also seen in the image that shows the inside of the
A/C setup. Note that the blinds do wrinkle a bit as they pass over the
seam between the upper and lower sashes, but I think this is acceptable, since
real blinds often do the same.
With the picture windows in place, the inner half of the store front could be
added. The inner portion both sandwiches the glazing in place, and blocks off
the interior of the model. The same sheet of paper includes printed flowers to
cover this up, as if they were a window display. When I got to this step, I
was still thinking about putting in an interior, so I cut that away. I used a
number 11 blade here, which was a mistake, since I ended up slicing into the
bottom of the sill on one side. A number 17 chisel blade would have been a
better solution. I painted the interior sill white.
The same part includes the front door, along with a short ledge that should
lead to the steps, which are another part. I painted the doors and their
recess black, then came back with gold paint and painted the doorknobs to give
them the look of brass. Finally, I dry brushed some copper and gold onto the
edges of the recess in which the door sits, as if generations of people had
brushed against it, giving it a slightly polished, less-verdigrised look.
NEXT: Fire Escape


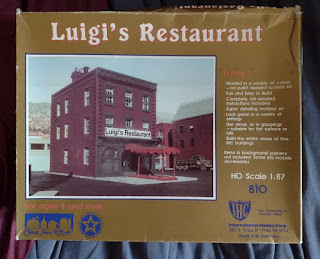 Luigi's Restaurant was one of a series of nearly identical kits offered by
IHC. AHM and Model Power offered similar kits, and I understand that all
three companies used the same molds. The kit contains four walls,
separate windows, base plate, roof, and a sprue of architectural details that
includes the front wall of the first floor storefront. Optional extras,
such as roof details and panels for bricking over a few of the windows, are
also included. Buildings like these are ubiquitous in the US, and
probably in many international cities: basic, three-story brick structures
with a storefront at ground level and offices or residences above. Entry
to the upper levels is through a door on the side, near the back, so an alley
is necessary between neighboring units. A few kits included a raised
roof, bay windows, or other such details.