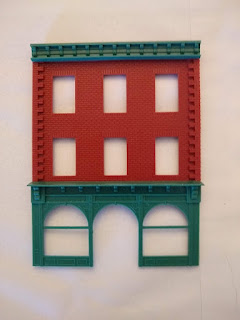
 Luigi's Restaurant was one of a series of nearly identical kits offered by
IHC. AHM and Model Power offered similar kits, and I understand that all
three companies used the same molds. The kit contains four walls,
separate windows, base plate, roof, and a sprue of architectural details that
includes the front wall of the first floor storefront. Optional extras,
such as roof details and panels for bricking over a few of the windows, are
also included. Buildings like these are ubiquitous in the US, and
probably in many international cities: basic, three-story brick structures
with a storefront at ground level and offices or residences above. Entry
to the upper levels is through a door on the side, near the back, so an alley
is necessary between neighboring units. A few kits included a raised
roof, bay windows, or other such details.
Luigi's Restaurant was one of a series of nearly identical kits offered by
IHC. AHM and Model Power offered similar kits, and I understand that all
three companies used the same molds. The kit contains four walls,
separate windows, base plate, roof, and a sprue of architectural details that
includes the front wall of the first floor storefront. Optional extras,
such as roof details and panels for bricking over a few of the windows, are
also included. Buildings like these are ubiquitous in the US, and
probably in many international cities: basic, three-story brick structures
with a storefront at ground level and offices or residences above. Entry
to the upper levels is through a door on the side, near the back, so an alley
is necessary between neighboring units. A few kits included a raised
roof, bay windows, or other such details.
The kits are molded in four colors, so no painting is necessary - they're
entry-level models, just above snap-fit. Luigi's appealed to me
as the first to look at, since the walls are molded in a dark red - I figured
I could avoid painting altogether and move directly onto weathering.
More on that in a later post. The green color looks to me like a
weathered copper, too.
Since the windows are separately molded, they are easy to cut open, and it was this discovery that led me into a further exploration of the kit's possibilities as the foundation of a detailed, realistic model.
I should point out that this is the second of these kits I've built. Some 25 years ago I made and detailed one and gave it to a friend. So, when I decided to get back into the hobby, this simple, familiar kit felt like a natural start.
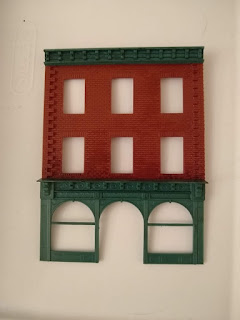
In the second image, I've assembled the front wall, which is three pieces. The
openings for the windows are obvious, but I haven't added them yet. This
shows the basic look of the kit, without any weathering applied, or any
priming or paint. I've used brush-on liquid styrene cement here, which I
find works better than the thicker cement that comes in a tube.
If I were to do it again, I would prime the parts and paint them, even if I wanted the same colors. Much too late, I realized that there is a slight sheen to the parts. The sheen isn't severe, and I don't think anyone would look at it and say "that's shiny", but it does detract from the realism - it's obvious that something's wrong, even if it isn't obvious what exactly is wrong.
I would also plan out the interior, or its lack, before starting the exterior. I knew that I wanted the storefront windows to say "Clyde Bruckman, Life Insurance," and that some of the windows should be open, and some fitted with air conditioners, but I hadn't made a decision about an interior. As a result, I put the walls together without installing braces for internal floors, and adding those after the fact isn't feasible. Life is about making mistakes and learning from them.
Related, I got further along in my build process than is comfortable before deciding to add illumination. Kits of this type are prone to light leaks at their seams and through the plastic (the walls will glow). The solution is to paint the interior black, even if it's later painted another color; and to place an additional strip of plastic along the seams; but again, this should be done early in the process. Whether painting the exterior walls will have the same result I don't know, but I didn't do so in this case.
The third image shows the same wall with some weathering. All I've added is India ink diluted in rubbing alcohol. The ink is an ancient bottle from Higgins (I think), and the rubbing alcohol is store brand. The ink settles into crevices, deepening them. Used sparingly, it creates deeper shadows to give more weight to a model, but here I've painted it over the entire surface, in multiple dilute coats, to give a grimy, inner-city look.
I'll point out again that this is India ink, not calligraphy ink. India
ink can be diluted almost forever without the pigment particles becoming
discrete. If you dilute calligraphy ink too much you get blobs of
pigment separated by clear areas with no pigment. These days, there are
inks specifically for modelling, which I expect have the infinitely-dilutable
characteristics of India ink, but in colors beyond mere black. Here,
black is what I'm looking for so there was no need to look any further.
I used a large, soft-bristled bush here, overlapping each stroke with the next to avoid lap lines, without bothering to worry about how
even the coat was. As long as everything was wet, I was happy.
With multiple thin coats, an area that received less pigment on one coat will
probably receive more on the next, and grime isn't even, anyway.
No comments:
Post a Comment